pathscapePathscape
Get started with PathscapeThis guide will help you set up your account, so keep this tab open while you sign up by clicking on the Sign up button
Register Your OrganizationTo setup your organization's account follow these steps below.
Step 1
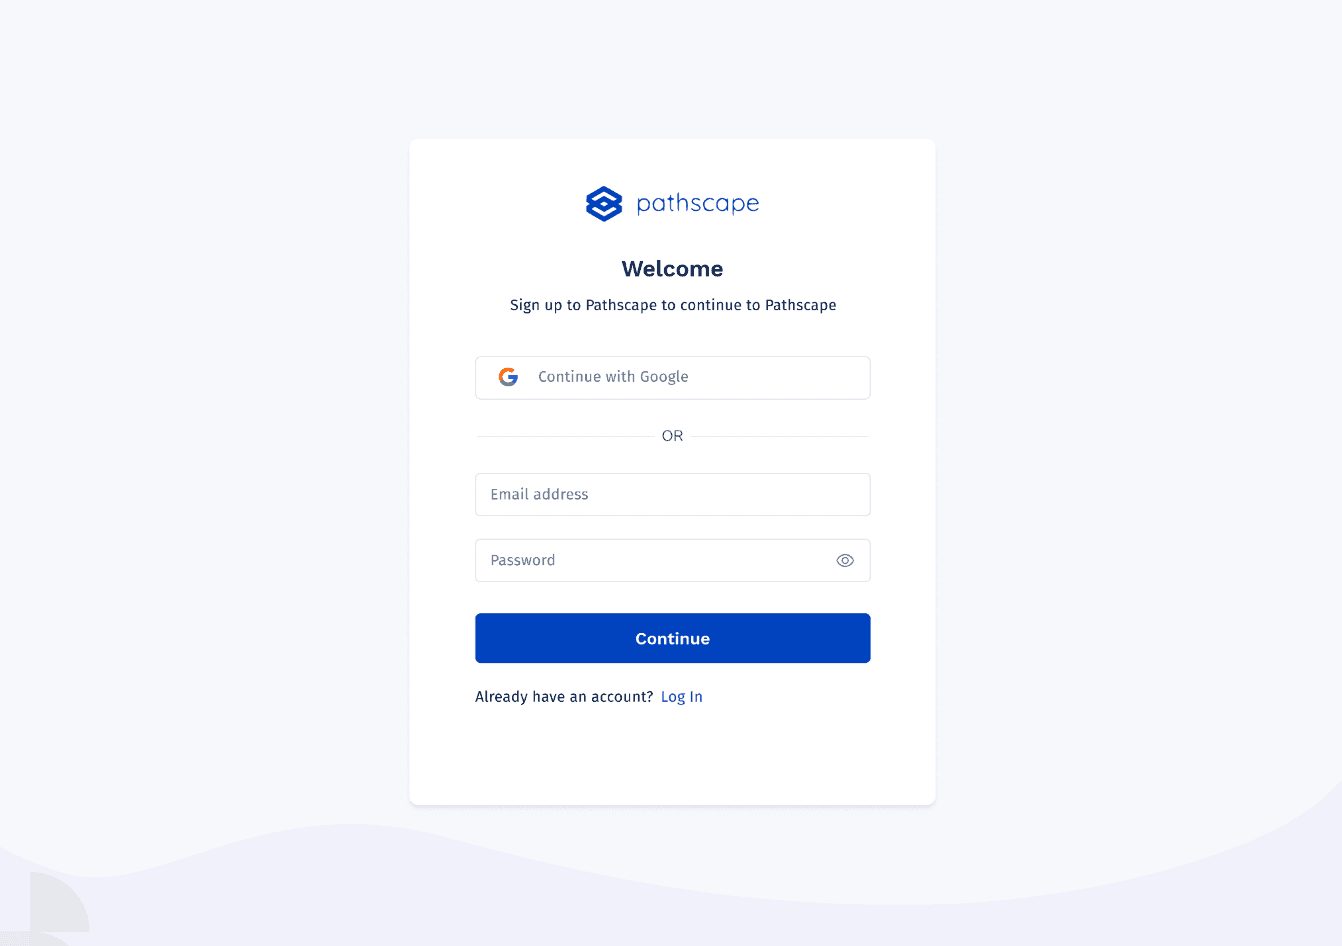
1. Click the Sign up button and enter your email address and password.2. Enter the 6 digit code sent to your email.
pathscape
Step 2
1. Click Create Organization.2. Enter personal details, organization details, select currency and click Create account.
pathscape
Step 3
Sign into the organizations you have created by clicking on the organization's avatar.
pathscape
Change / Reset PasswordReset your password by following these steps below.
Step 1
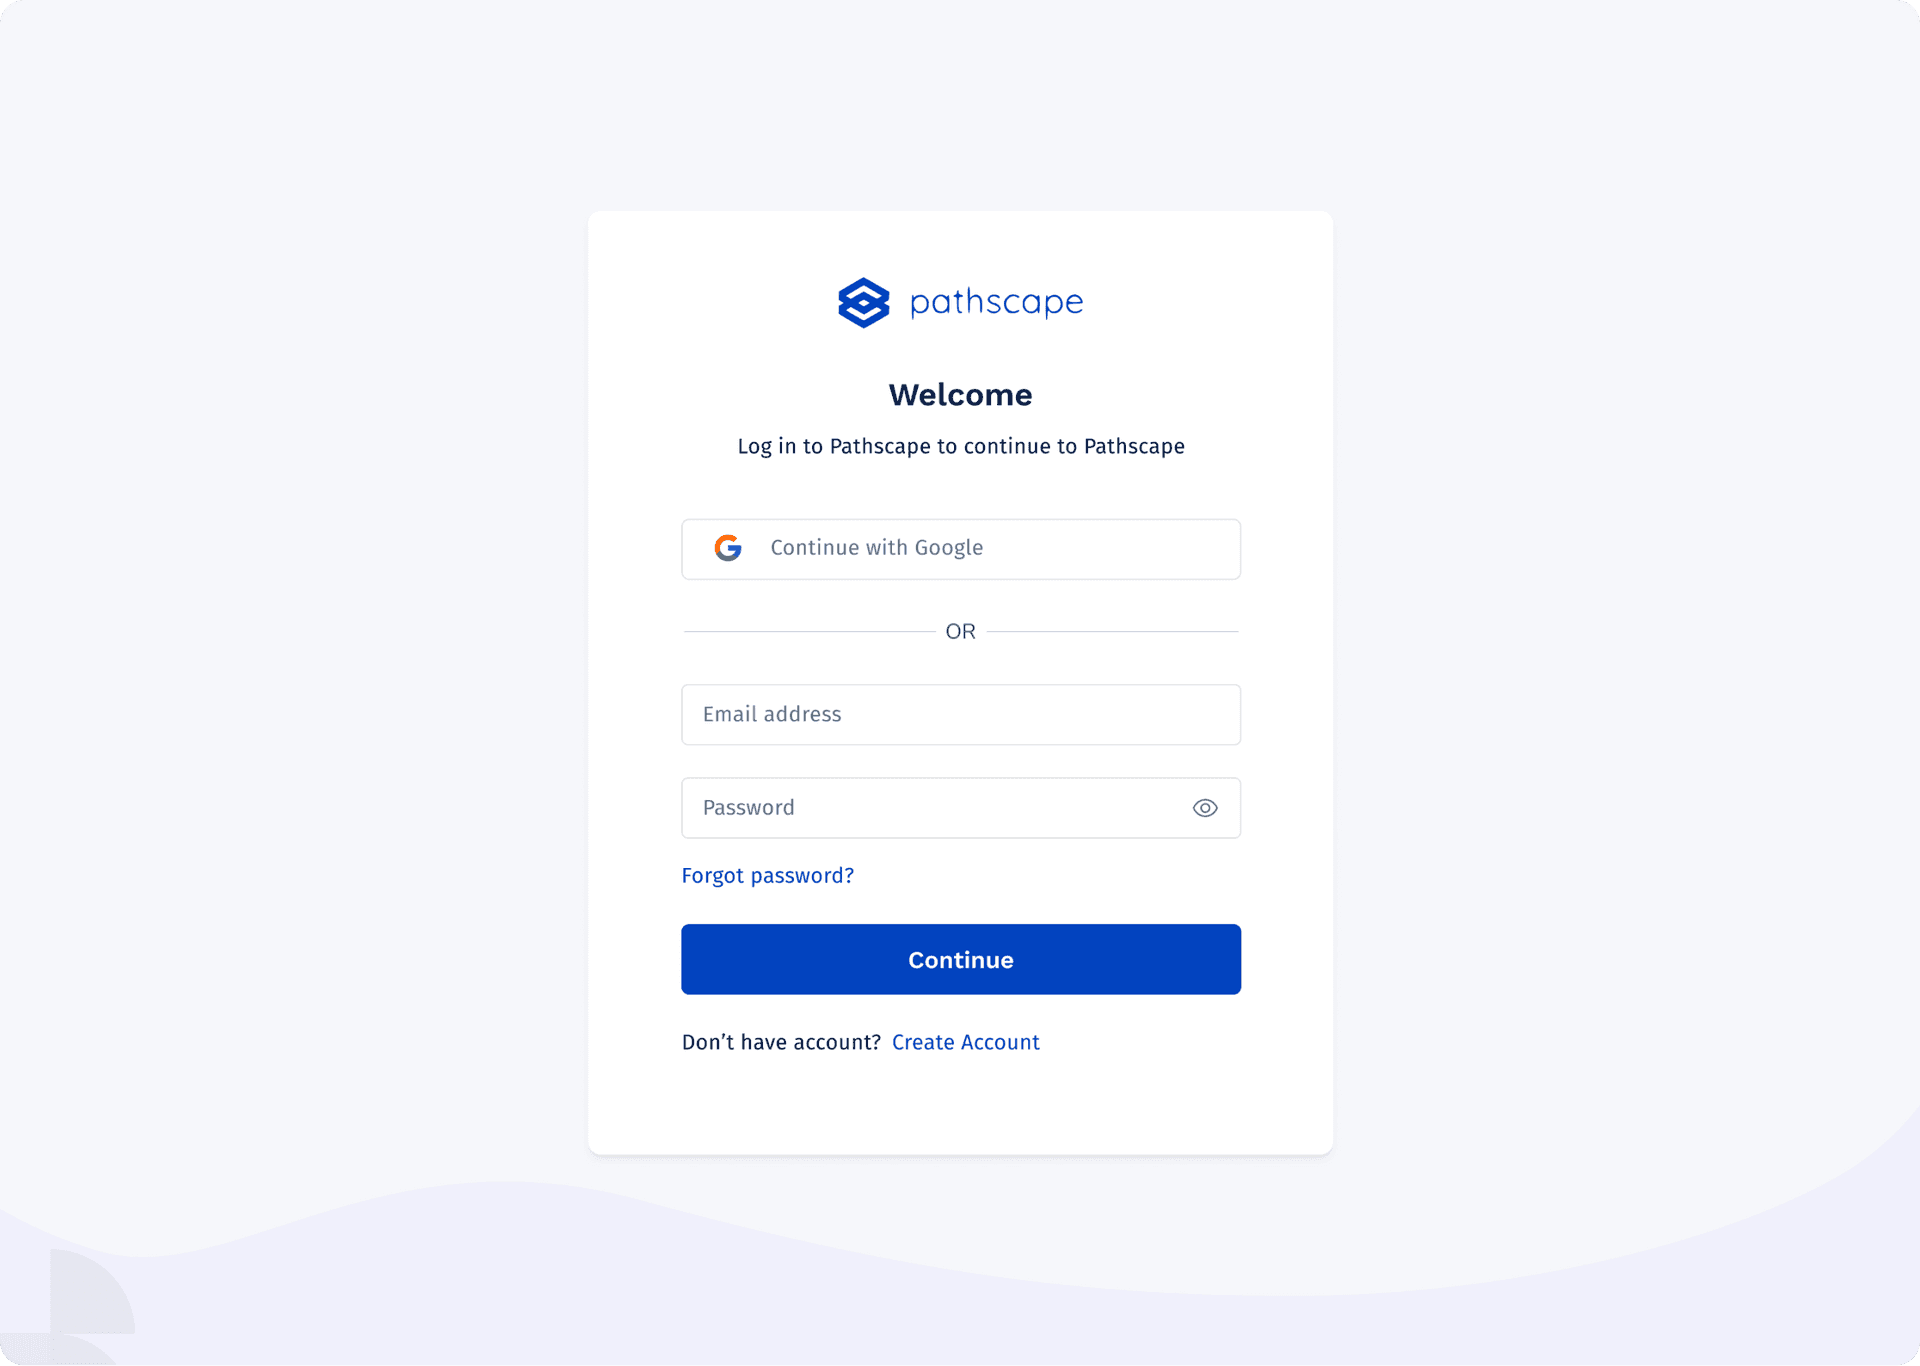
On the log in screen, click on “Forget password”
pathscape
Step 2
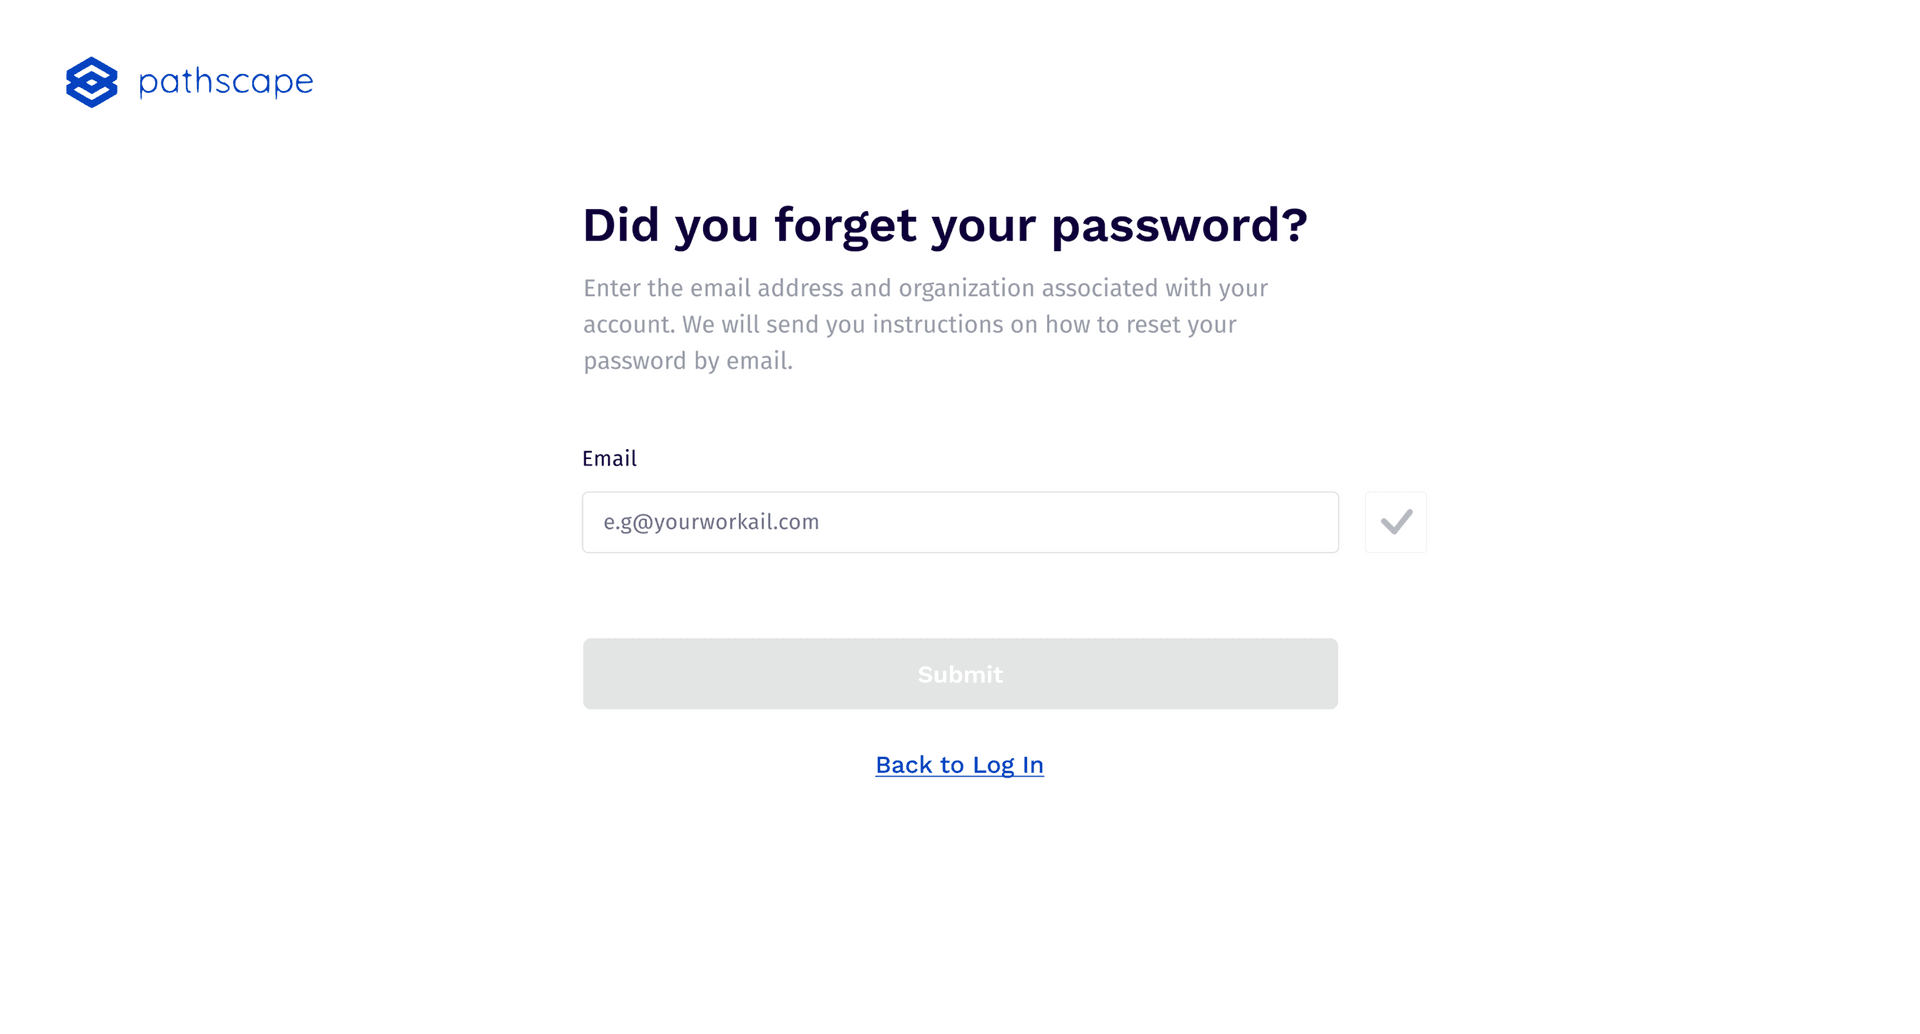
Enter your email and a verification code would be sent to you. click “Submit”
pathscape
Step 3
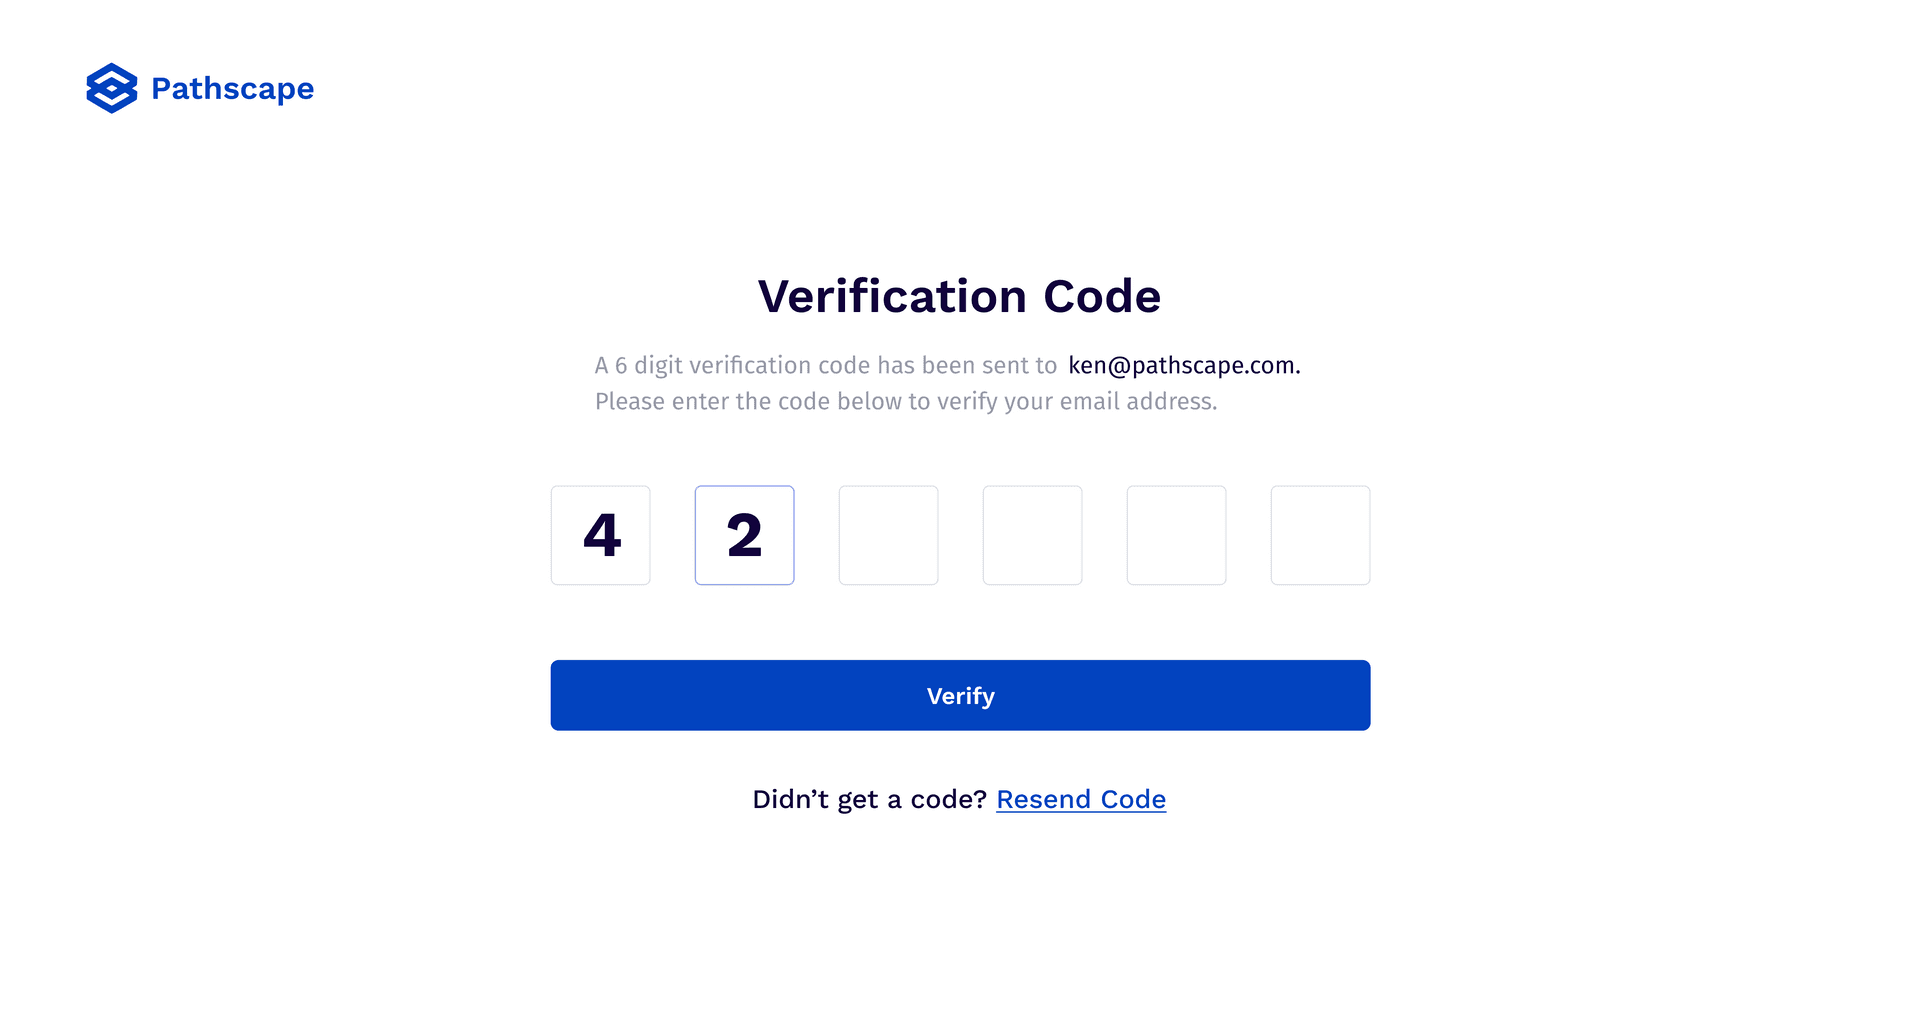
Enter the verification sent to you. this is required in-order to complete your password reset steps click “verify”
pathscape
Step 4
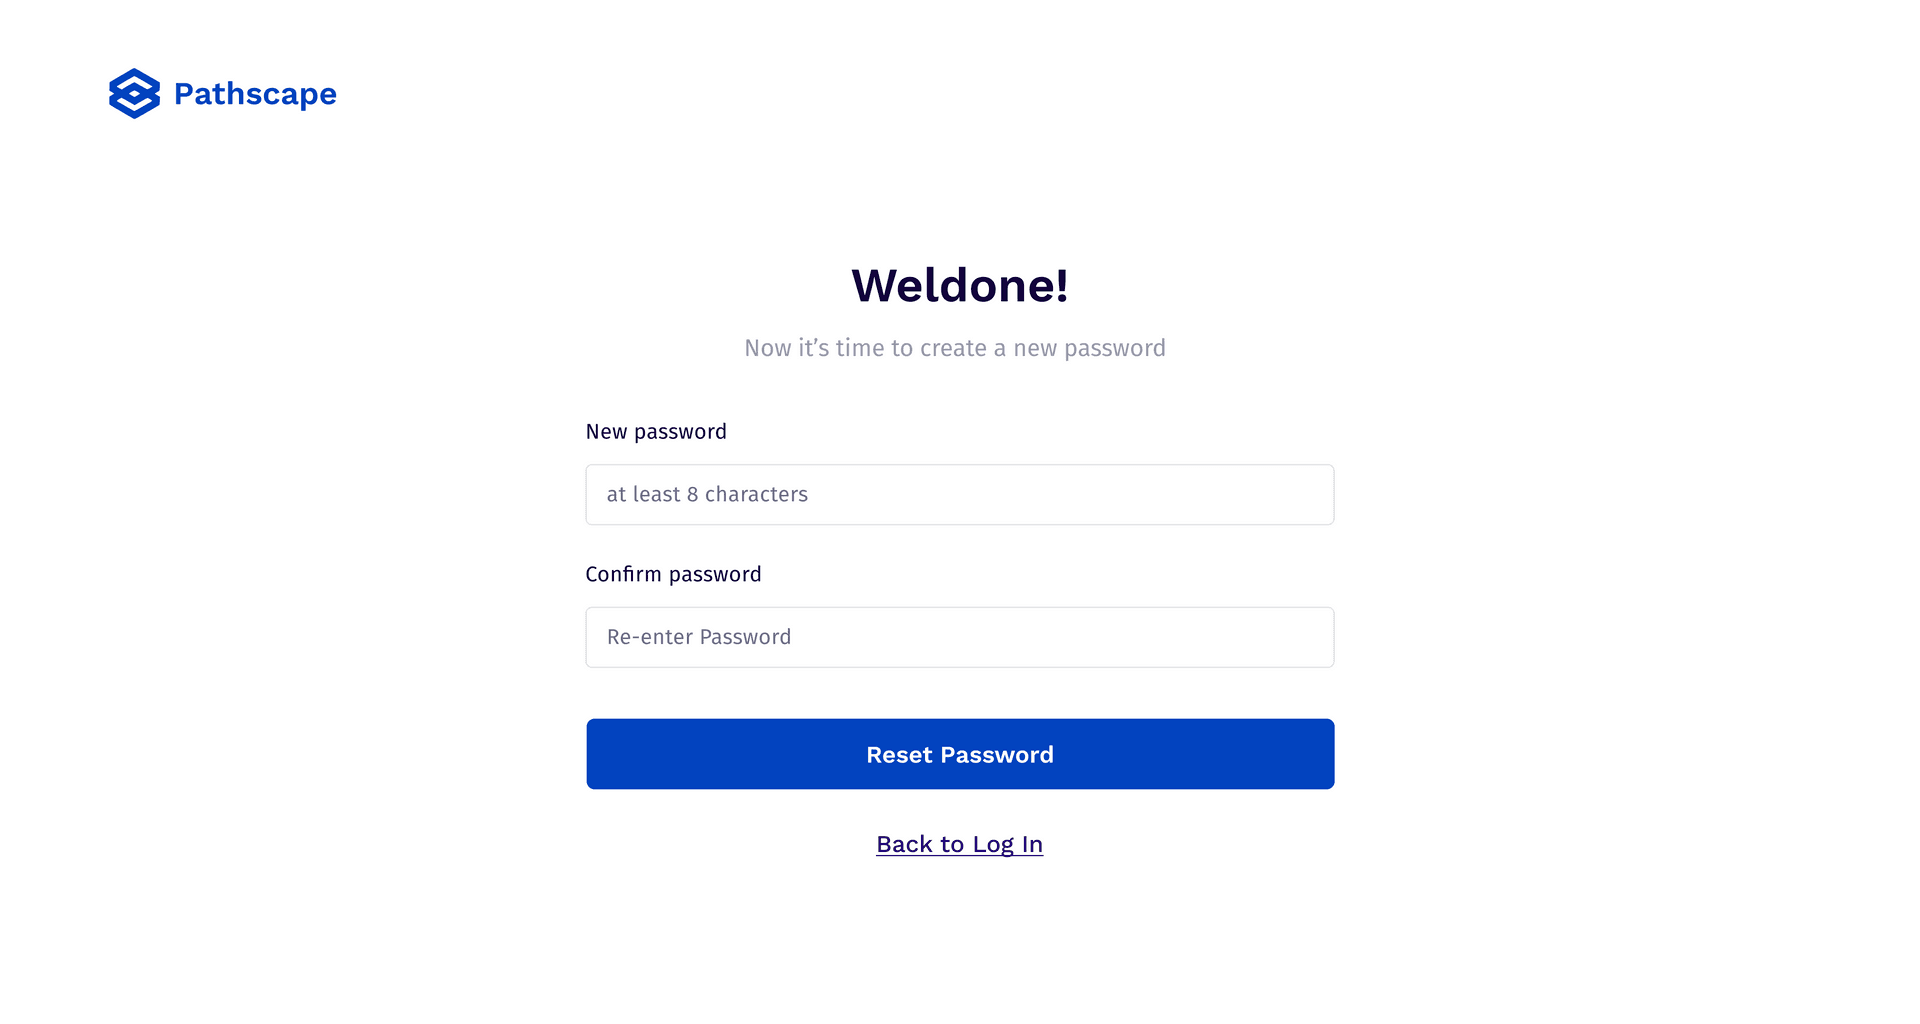
Enter a new password. Click “Reset Password”
pathscape
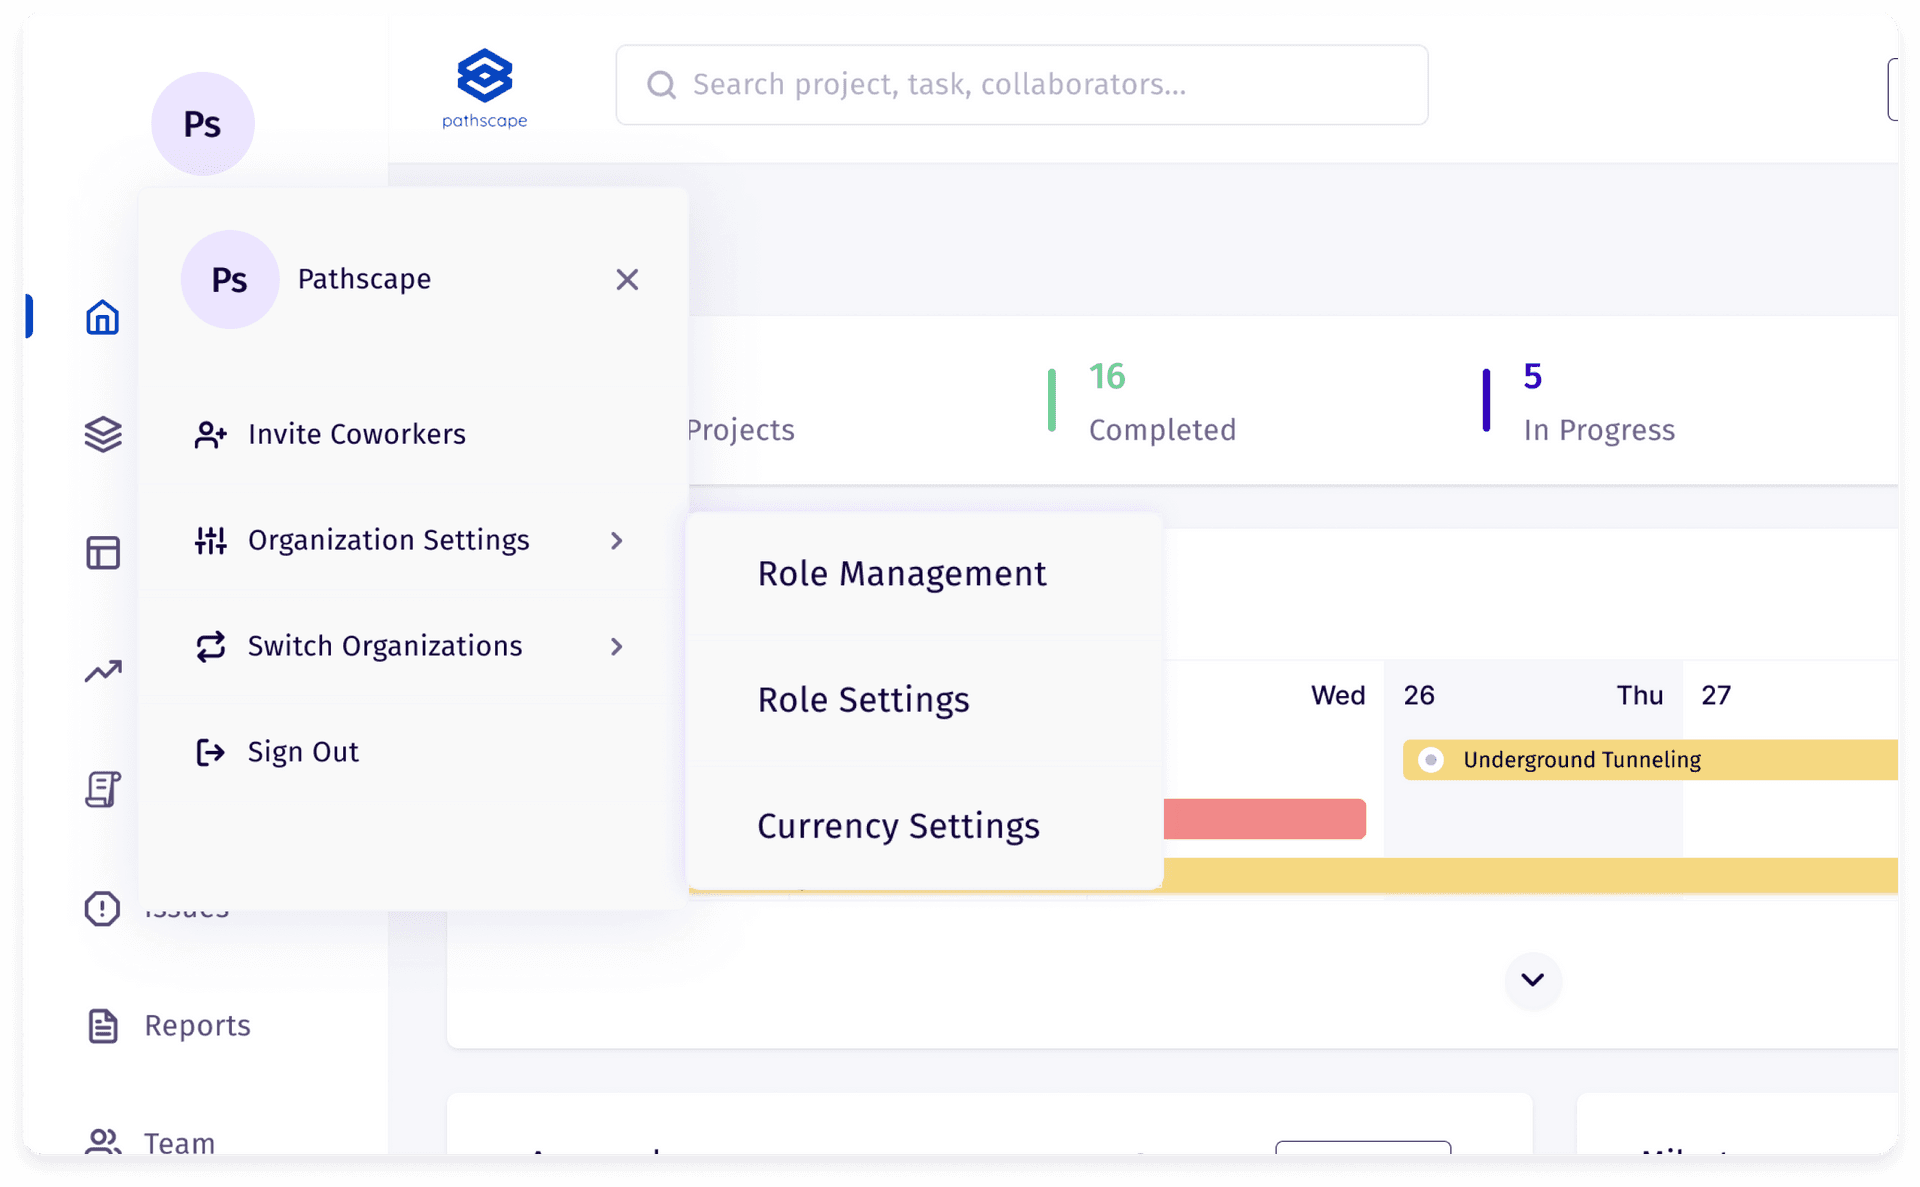
Invite CoworkersInvite your coworkers into your organization’s workspace by following these steps.
Step 1
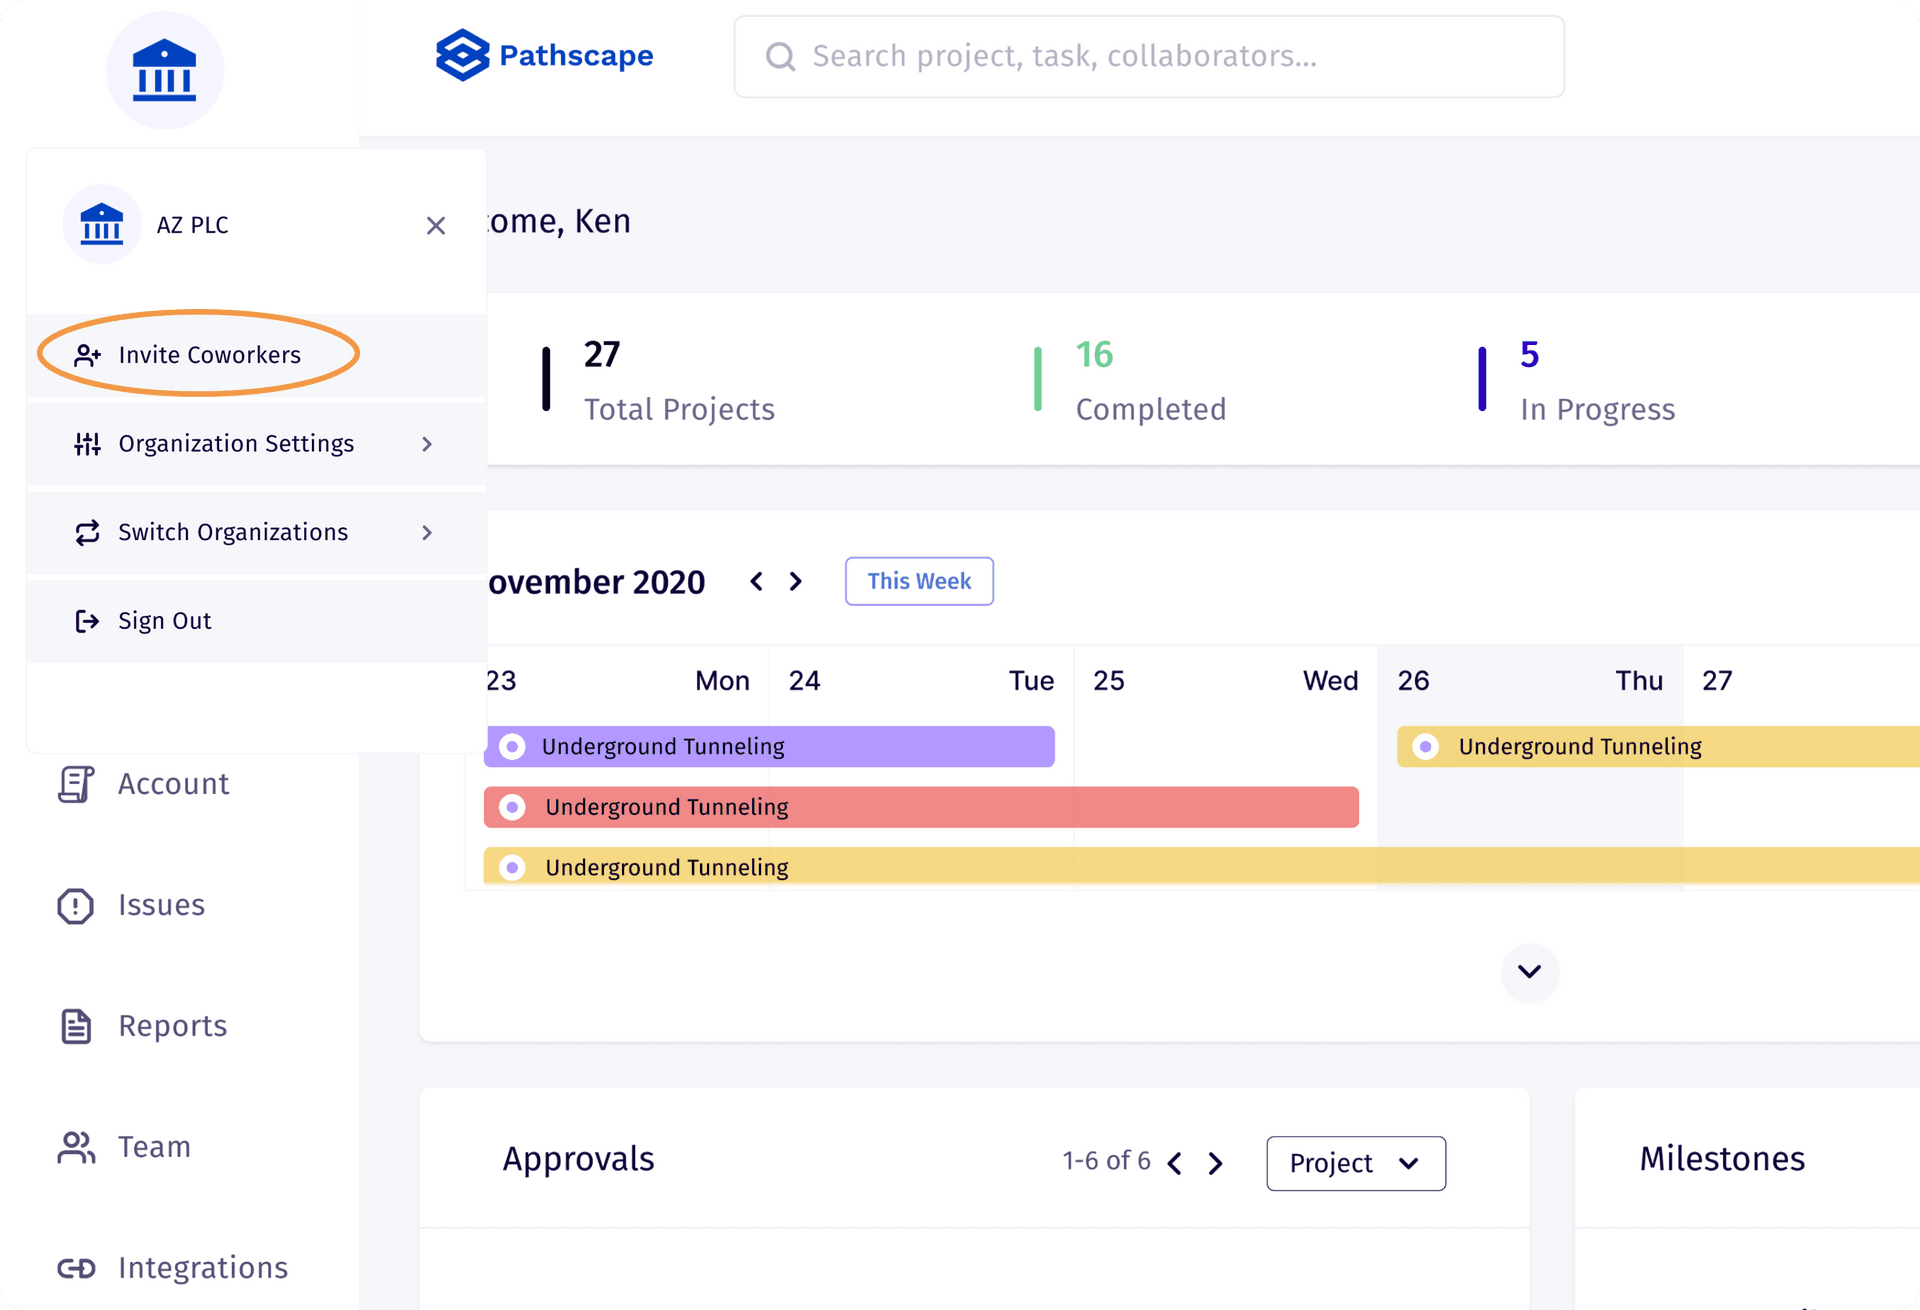
Click your organization’s avatar Select “Invite Coworkers”
pathscape
Step 2
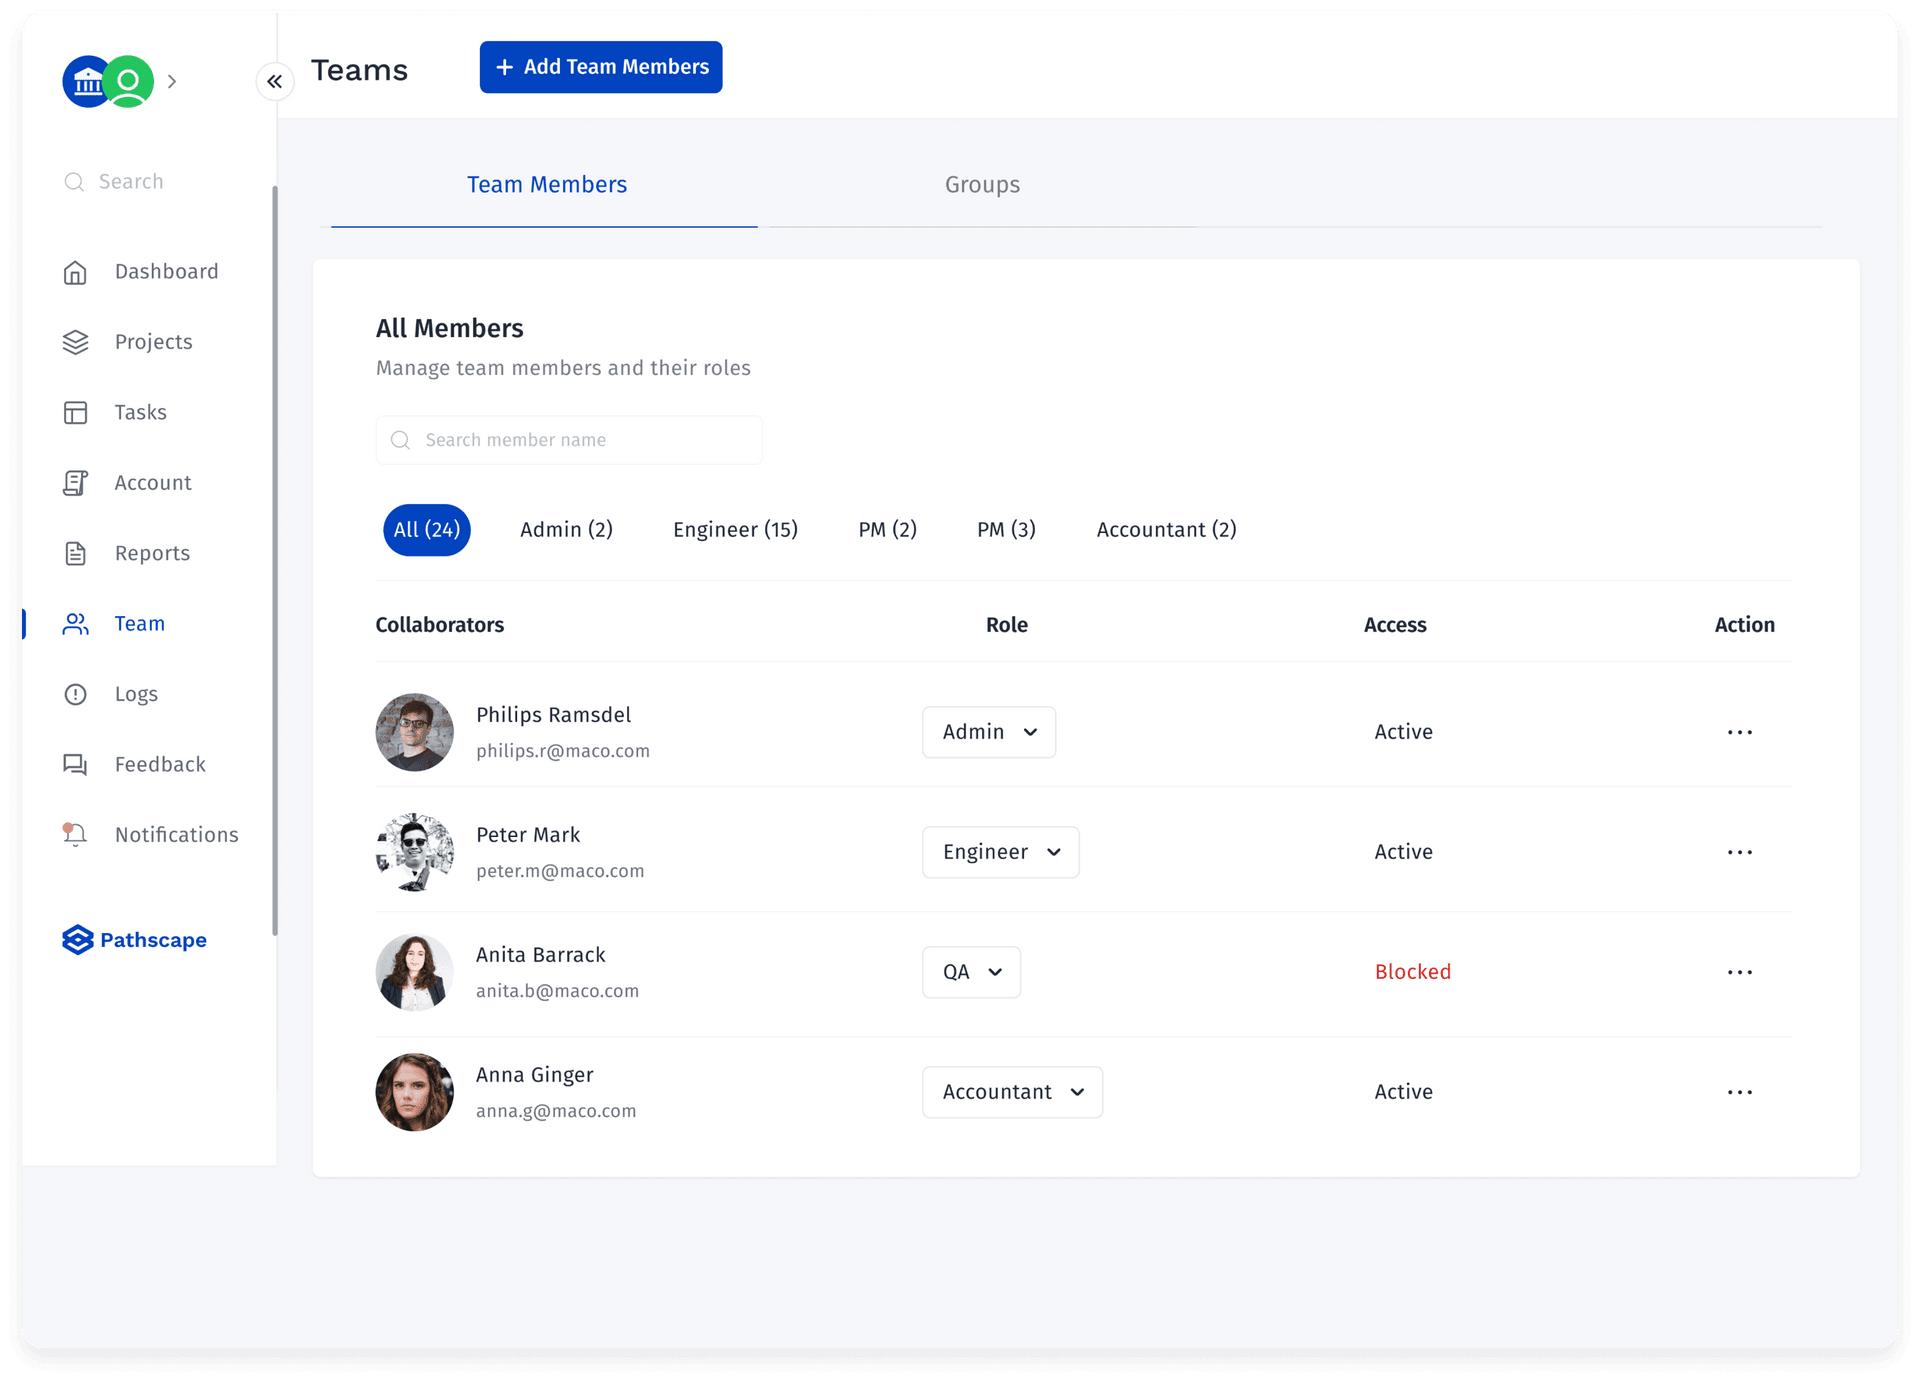
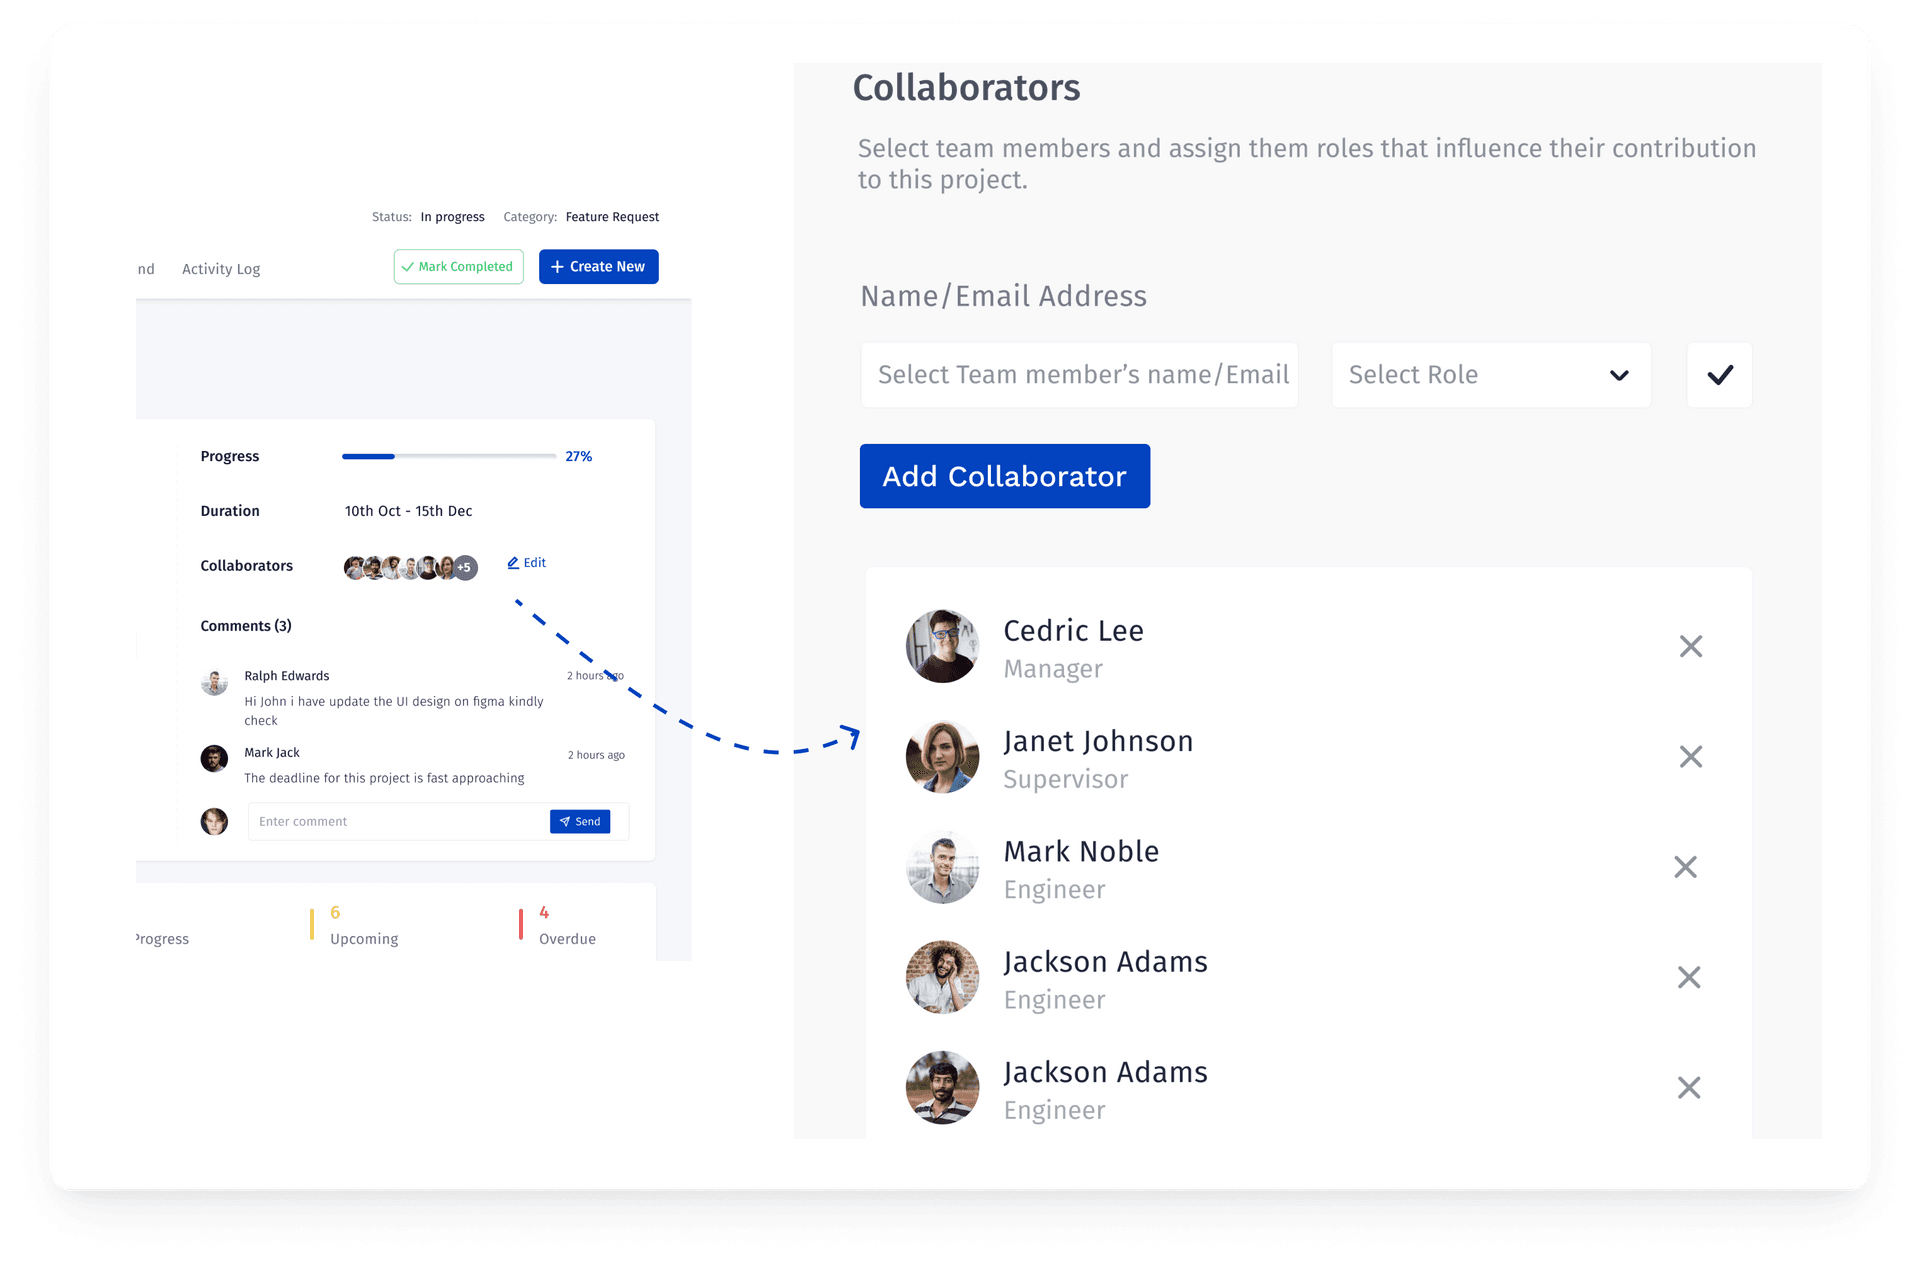
Enter your coworkers email address. Assign a role. Click “Send Invite”
pathscape
Profile SettingsSetup your profile by following these steps below.
Step 1
Click on your profile picture at the right top corner then click on “Profile”.
pathscape
Step 2
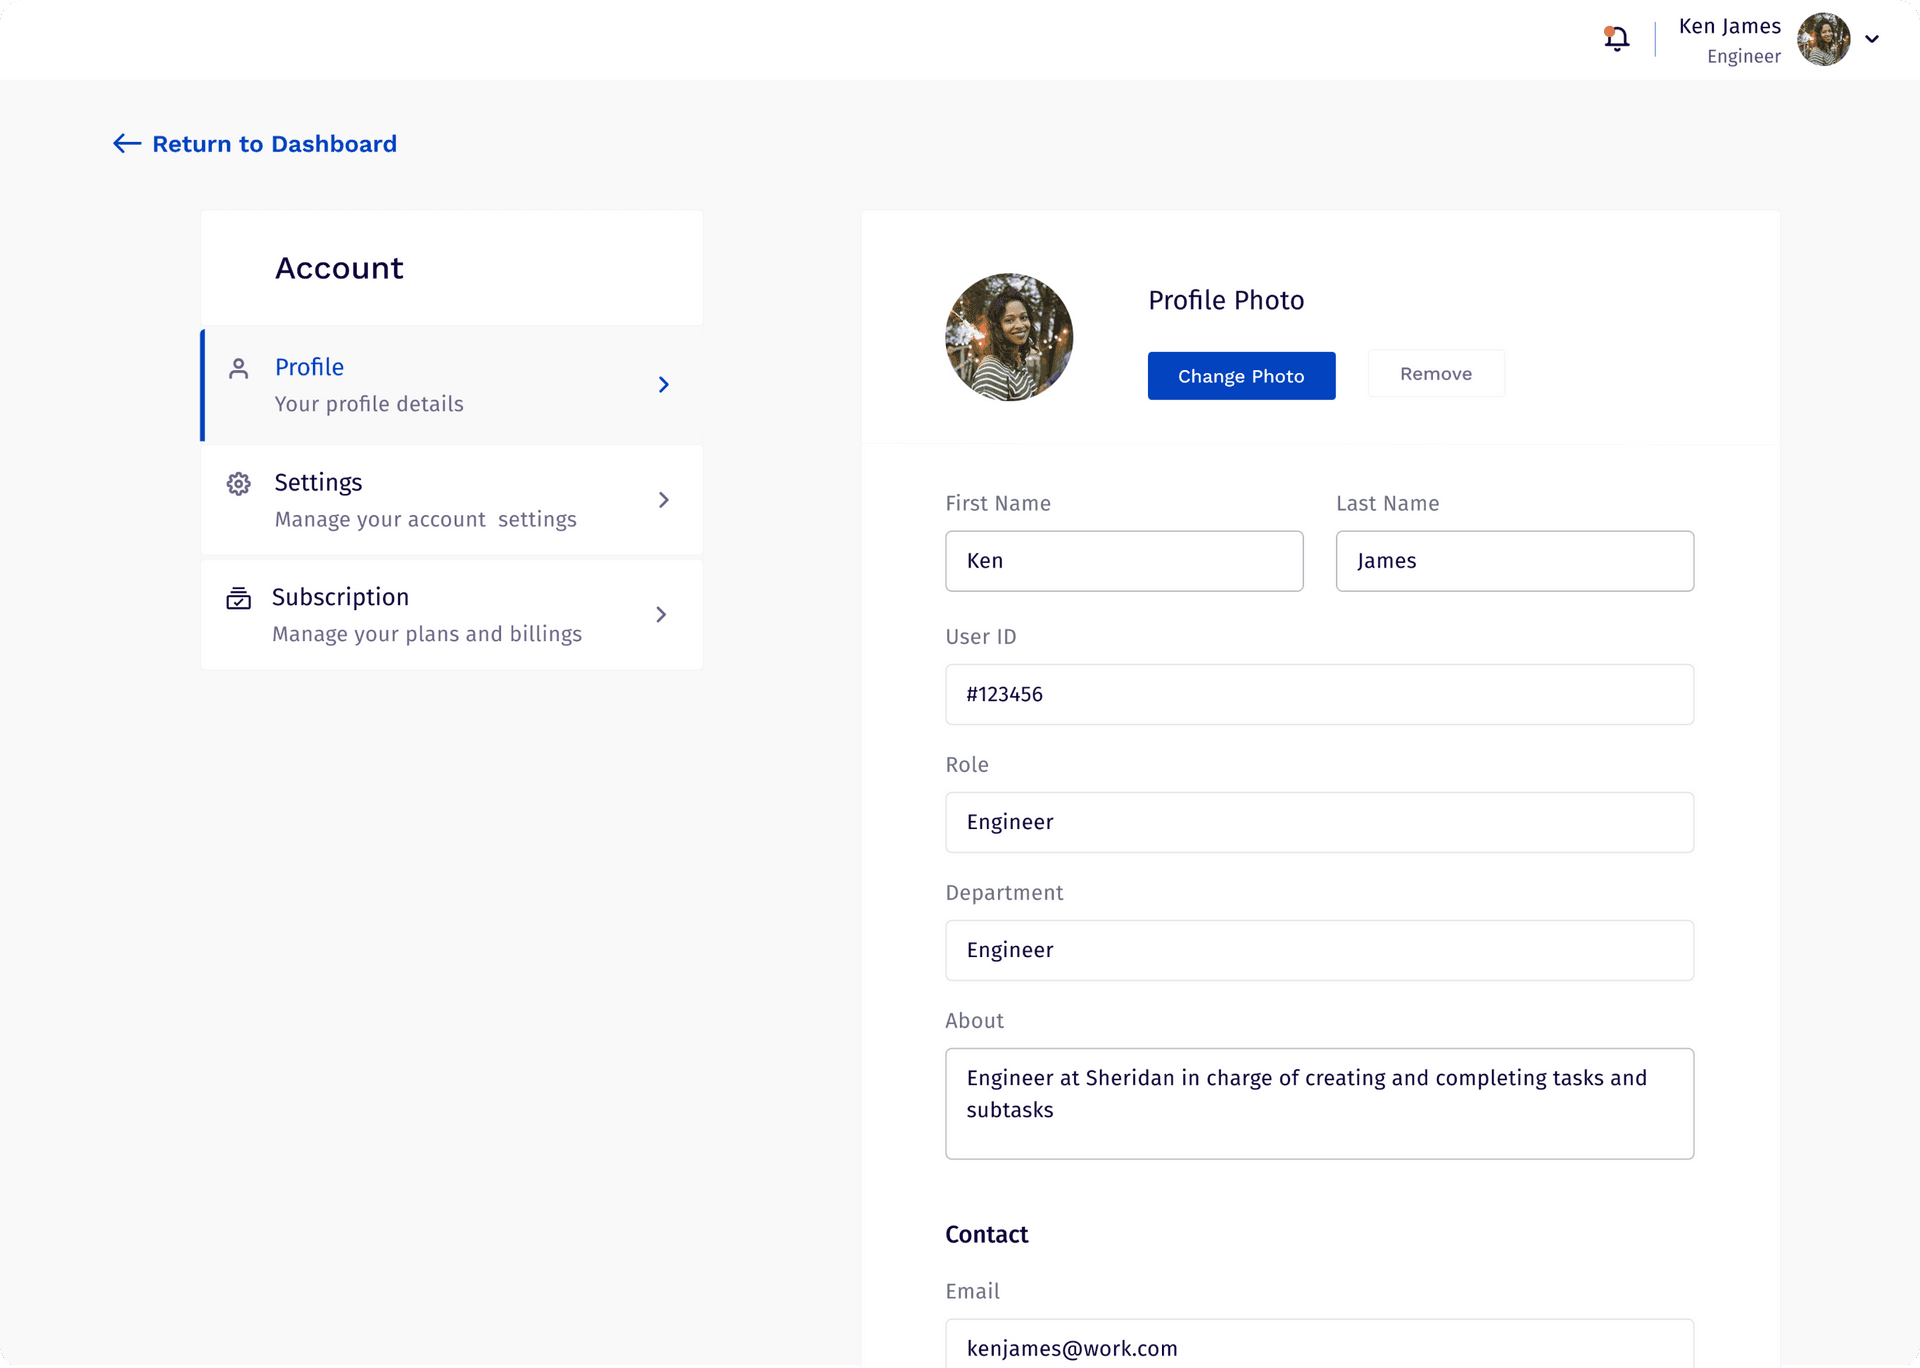
Click on profile tab at the left corner.
pathscape
Admin and Control
ProjectsThis will guide you on how to create your first project. If you don't have account yet click here
Highlights
Creating projectsTo create your first project, follow these steps below:
Step 1
  1. On the side menu select the project tab
  2. On the project list page click the +Create new project button
pathscape
Step 2Enter project Parameters by taking the following steps:
  1. Enter your project name
  2. Enter project category (e.g. Construction, Events, Software e.t.c)
  3. Enter project description
  4. Set project duration
  5. Set project priority
  6. Enter project budget in any currency of your choice
  7. Choose to either publish or save your project
pathscape
Note Step 6:If you want your project budget in a prefered currency you have to set the currency parameters on the currency settings page. Learn More
Note Step 7:Saved projects appears as draft and would not go through approval stage until it is published.
Add collaborators to projectTo add collaborators to your project follow these steps below:
Steps
  1. On the project details page click the collaborator Edit icon
  2. Enter team member's name or email address
  3. Assign a role to a team member
  4. Click the Save button
pathscape
Working with Kanban BoardsPathscape’s Kanban board enables you visualize your your work flow so you know the stage at which our task is. This is represnted using cards which shows work items and columns which shows the stages or status of each item.
The kanban board is divided into 4 stages
  1. Backlog
  2. In Progress
  3. Completed
  4. Closed
pathscape
Move TasksTasks can be moved from one stage to another by simply hovering on the card, click and drag to a desired position.
TasksThis will guide you on how to create your first task. If you don't have account yet click here
Create TasksTo create a task follow these steps below.
Step 1
  1. On the project details page click the Create button
pathscape
Step 2
  1. Choose Task from the dropdown list
pathscape
Step 3
  1. Enter task name
  2. Enter task description
  3. Set task duration
  4. Set task priority
  5. Assign task to team members
  6. Enter task parameters
  7. Choose to either publish or save task
pathscape
Note Step 7:Saved tasks appears as draft and can not be started until it is published.
Manage TasksChange task status
Task can be marked as
  1. Todo
  2. In Progress
  3. Completed
  4. Closed
pathscape
Task Menu
  1. Edit Task
  2. View task details
  3. Clone Task
  4. Create subtask
  5. Delete task
pathscape
Note Step 5:Cloning a task simply means you want to create a copy of this task. To do that you need to enter a scale factor to generate the details to create a new task.
SubtasksChange subtask status
Task can be marked as
  1. Todo
  2. In Progress
  3. Completed
pathscape
Task Usage LogsManage cost items
Step 1
  1. To manage task items click + Manage cost items
pathscape
Step 2
  1. Select cost item
  2. Enter cost item name
  3. Enter quantity used
  4. Add new item
  5. Remove cost item
  6. Click save
pathscape
Task usage logs
  1. To create a log, click + Create Log
pathscape
  1. Select task cost item
pathscape
  1. Enter quantity used and click on save
pathscape
MilestonesThis will guide you on how to create your first milestone. If you don't have account yet click here
Creating MilestonesTo create milestones, follow these steps below:
Step 1
  1. On the project details page click Milestone
  2. Click + Add New
pathscape
Step 2
  1. Select tasks you wish to add to your milestone and click Next
pathscape
Step 3
  1. Enter milestone name and description then click the save button
pathscape
VariationsVariations are created when requesting for an extended timeline of a project or you want to increase or decrease a budget of a project.This will guide you on how to create your first variation. If you don't have account yet click here
Create VariationTo create your first variation, follow these steps below:
Step 1
  1. On the project details page click Variation
pathscape
Step 2
  1. Click + Add New
pathscape
Step 3
  1. Choose duration
  2. Budget
  3. Leave a comment
  4. Create
pathscape
Note:You can merge variations with the current project it is intended for by simply clicking the Merge button
Navigating account dashboardThe Accounting dashboard highlights budget and cost data for each project such as the baseline budget, planned budget, actual budget and earned value.
pathscape
Manage CurrenciesTo manage your organization’s currencies take the following steps:Click on your Organization’s avatar > Organization settings > Currency settings
To add currencies to your organization:
  1. Choose the currency you wish to add
  2. Enter currency rate in your local currency
  3. Click save
Set organization’s primary currencyYou have added curriencies to your organization, Now it is time to set each currency’s exchange rates. We understand how volatile exchange rates can be, however as the exchange rate changes you can as well edit this rate in your currency settings.
Set organization’s currency rateYour primary currency is the currency your organization trades with. It is usually your local currency, however you may decide to set any currency of your choice as your primary currency
Edit organization’s currency rateWe understand how volatile exchange rates can be, to edit exchange rate do the following.
pathscape
Disbursement ApprovalTo approve a disburesement request go to your project dashboard, locate Approval section, click on view and a modal will pop-up, choose to either approve or decline request.
pathscape
Approve or decline request
pathscape
Disbursing approved requestOn the accounting dashboard, locate Disbursement request section, then click on Disburse button to disburse fund.
pathscape
Cost itemsThis will guide you on how to create your first project, if you don't have account yet Click here
Create and manage cost itemsWhen creating a new project you can associate tasks with cost items or a rate card to define your tasks with work rates and estimate costs. The sum of cost items in a project amounts to the project’s planned budget. You can create cost items from scratch in Organization settings. Cost items can have a name, unit of measurement, currency type, amount and tags such as billable, material, equipment, vendor, etc.The ability to create cost items cards is only available for the Growth and Business plans only.
  1. Click on your organization’s avatar
  2. Choose organization settings
  3. Choose project settings
  4. Enter cost item name
  5. Enter unit of measurement
  6. Choose currency
  7. Enter amount for your cost item
  8. Tag your cost item or choose from system suggested tags
  9. Click create
pathscape
Click on your organization’s avatar
pathscape
Choose organization settings
pathscape
Choose project settings
pathscape
Manage cost activitiesGain full visibility of your projects by tracking and managing costs in your tasks. You can view the planned and actual costs for a task. You can also record the amount consumed or amount of work done by submitting a usage log to view the earned value for a task.
  1. On the side menu, click the Task tab
  2. Choose the task you wish to manage it’s cost activity
  3. Click +manage cost item
  4. Enter cost item parameters
pathscape
Choose task
pathscape
+Manage cost items
pathscape
Project Portfolio ReportTo generate your project portfolio report, click on Project Portfolio Report card on the Reports page.
Generate Detailed Report
Step 1
  1. Select Detailed Report from the two options on the page
pathscape
Step 2
  1. To minimize the amount of data shown, you can select the data you will like to view by clicking View Options
pathscape
Step 3
  1. You can download report and view it off the app by clicking Export Report
pathscape
View Project Analytics ReportTo view Analytics Report, click on Analytics
pathscape
Steps
  1. You can choose to view either Project Analytics or Budget Analytics
  2. You can also export analytics report
pathscape
Time And Material ReportTo generate time and material report, click on Time and Material Report card on the Reports page
StepsThe Time and Material Report shows detailed report on cost items, their budget, total quntity as well as quantity used and amount spent on the items.
    pathscape
    Time and Material Report Page
    1. 1Use the View Options dropdown to select and deselect parameters to view
    2. 2Use the Filter button to filter the collaborator to view
    3. 3Download report with Export Report
    4. 4Sort items and material data with the Project, Status and Progress dropdown
    5. 5View summaries for cost items and their status
    Milestone ReportTo generate your milestone portfolio report, click on Milestone Report card on the Reports page
    StepsThe milestone report shows detailed report on all existing milestones for projects
      pathscape
      Milestone Report Page
      1. 1Use the View Options dropdown to select the data to display
      2. 2Download report with Export Report
      3. 3Sort data to view with the Project, Status and Progress dropdown
      4. 4Filter Milestone Report
      5. 5Milestone Report is displayed based on what is filtered
      Collaborators PerformanceThis gives report on teams and team performance based on project or task given. To generate Collaborators performance report, click on Collaborator Performance card on the Reports page
      StepsThe collaborator performance shows detailed report on all teams
        pathscape
        Collaborator Performance Page
        1. 1Use the Filter button to filter the collaboration to view
        2. 2Download report with Export Report
        3. 3Sort collaboration data to view with the Project, Status and Progress dropdown
        4. 4View summary for tasks and their status
        5. 5View collaborators and their projects here
        Transactions ReportTo generate transaction report, click on Transaction card on the Reports page
        StepsThe transactions report shows detailed report on all disbursements and refunds
          pathscape
          Transaction Report Page
          1. 1Use the View Options dropdown to select and deselect parameters to view
          2. 2Use the Filter button to filter based on data to view
          3. 3Download report with Export Report
          4. 4Sort transaction data to view with the Project, Status and Progress dropdown
          5. 5View Summaries for disbursements and Refund
          Filter Transaction Report
            pathscape
            After clicking on Filter, a modal pops up and you can choose to generate report on Disbursed and refunded funds.
            Reports can also be generated based on projects and you can view transaction reports.
            Data range for a transaction can also be used to generate reports.